
Start with one account and one purchase
Download the iPhone or Android app, set a starting balance and record your next purchase. Give it a category that you will recognize later. Check the recorded balance against your own bank app or cash total regularly: manual tracking is only as complete as the entries you add.
A recorded balance is your own record, not a live balance supplied by your bank. Leave out an expense and the number can overstate what you have available. Credit limits are not income. Transfers between your own accounts should not be counted as new earnings.
SEE THE APP IN USE
One purchase. Three clear steps.
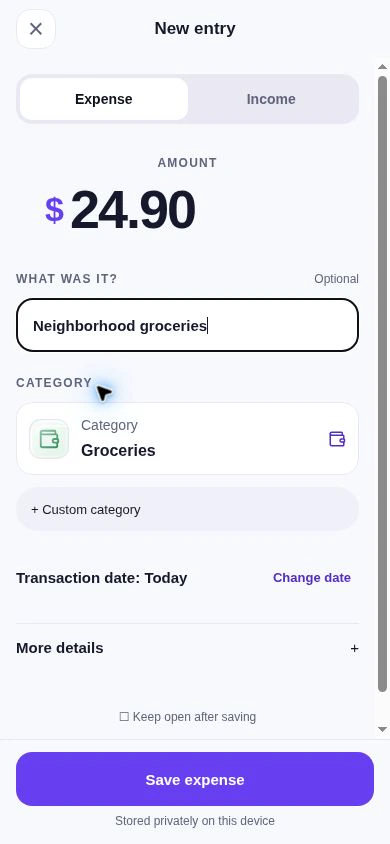
- Open Add expense, enter $24.90 for groceries and review the details.
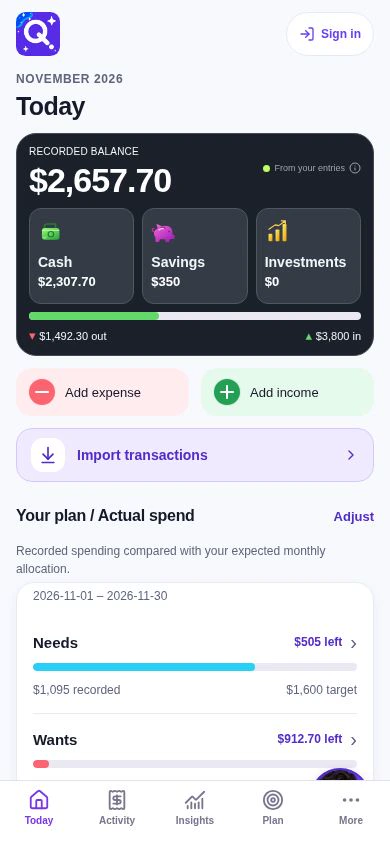
- Save the entry. In this example, the recorded balance becomes $2,657.70 and the Needs plan shows $505 left.
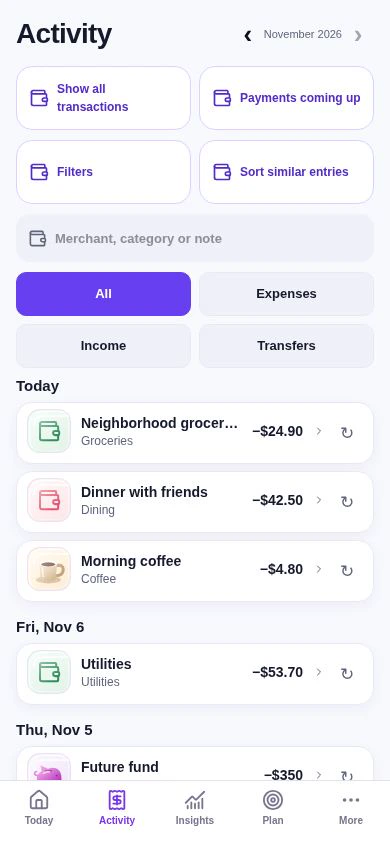
- Open Activity and find the saved purchase. Check the entry when reconciling your records.
No bank connection is needed for this manual workflow. The screens use fictional US dollar data.
Read the example and check the arithmetic
The app interface example starts with a recorded balance of $2,682.60 and $529.90 left in Needs. Saving a $24.90 groceries expense changes those figures to $2,657.70 and $505.00. The same $24.90 entry appears in Activity. These views were rendered from the app’s source in an isolated demo environment; they contain no personal financial records.
Import a statement when typing becomes a chore
Export a CSV from your bank and use the app’s CSV import. Parsing happens on your device. Review dates, signs, amounts, categories and duplicates before confirming the proposed entries. A statement import updates your records at that moment; it does not create an ongoing bank connection.
Optional PDF statement and receipt-photo extraction uses online AI processing after confirmation. This is different from local CSV parsing. Read the consent screen and review every proposed transaction; extraction can make mistakes.
| Method | Processing | What you do |
|---|---|---|
| Manual entry | Recorded on your device by default | Enter the amount, category and details, then save. |
| CSV import | CSV parsing happens on your device | Choose a bank-exported CSV and review proposed transactions. |
| Optional PDF or receipt extraction | Online AI processing after you confirm the file | Check the proposed amounts, dates and categories before confirmation. |
Cloud backup is a separate optional choice. Online AI and document features have allowances; check the current plans and privacy notice.
No bank connection and local storage are different choices
An app can avoid bank linking and still store its records in a cloud account. RenIQ Life keeps financial records on the device by default. Optional cloud backup and requested AI features work online as described in Privacy. Signing in is separate from turning backup on.
Local storage puts more responsibility on you to protect your device and preserve records. Review export, device-backup and account-deletion options before changing phones. RenIQ Life does not hold deposits, transfer money or act as a bank.
Who this approach fits
Manual tracking can suit you if you prefer choosing what you record, use cash, or want to learn where your money goes without linking an account. It asks for a small repeatable habit. If you need automatic imports, investment trading or a full desktop budgeting workspace, check those requirements before choosing any app.
- Log a purchase when you make it, while the amount is easy to remember.
- Reconcile your records with your bank or cash once a week.
- Give bills, flexible spending and savings a place in your monthly plan.
Turn the idea into a plan.
Try the free tool, then track your spending and goals in RenIQ Life. Local core features are free. Optional paid plans are available.
See the real app walkthrough →

Sources and scope
General education, not a personal recommendation. Examples are fictional. RenIQ Life does not hold money, execute investments or provide debt settlement. How we prepare content · Report an error.